Deploy an interactive data science environment
with JupyterHub on Docker Swarm

Open rack.to/jup
Go to Setup and get started
Use the arrow keys to navigate
Instructors
| Everett Toews | @everett_toews |
| Ash Wilson | @smashwilson |
Goals
- Learn Docker basics and Docker Swarm fundamentals
- Exercise these fundamentals by deploying JupyterHub on Carina, a hosted Docker Swarm environment
Agenda
Conventions
Bash and PowerShell
$ # bash command
> # powershell equivalent command
Replace multi-line backslash (\) delmininators with with backticks (`)
$ docker run \
  --name mycontainer
> docker run `
  -- name mycontainer
Setup
Setup
- Sign up for a Carina account
- ⭐️ Be exact with your email and password ⭐️
- You only get one chance to enter them!
- Type your email and password into a text editor then copy them into the form
- Don't create a cluster just yet
- Get your API Key under your username in the top right corner
- Go to the next slide
Installation
- Git
- Docker Version Manager
- Utility for managing Docker client versions
- Manage Docker client versions with dvm
- Do the Install dvm section only
dvm install 1.11.1- Carina CLI
- The CLI for the Caria API
- Getting started with the Carina CLI
- Do the Download and install the CLI and Configure with Carina credentials sections only
carina ls
Site Overview
Get a feel for the Carina website.
- Carina
- Documentation
- Note the Edit on GitHub links on every page
- Blog
- Subscribe via RSS
- Community
- Use your Carina email and password
- Status
- Subscribe to updates
Add a Cluster
Setup a cluster where we can run Docker containers
- Log In
- Add Cluster
- Cluster Name: mycluster
- Enable Autoscale: unchecked
- Get Access
- Download File
- Unzip
- List files
Docker
Comparison
 |
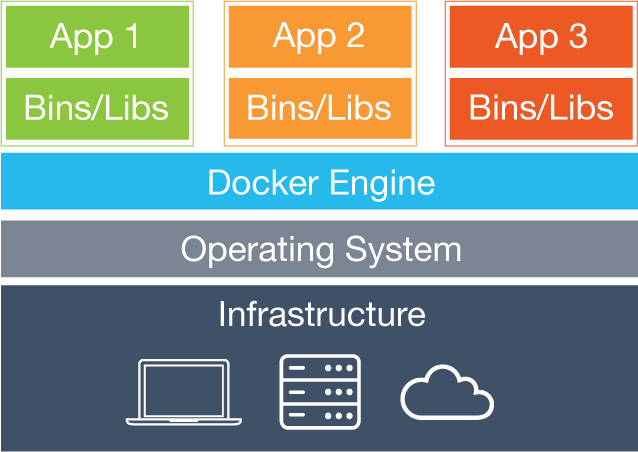 |
| VMs | Containers |
Benefits
- Better resource utilization
- Application packaging (Docker images)
- Process isolation
- Reproducible environments
- Immutable infrastructure
- Composable
- Multi-Cloud
- Encourages 🐮🐮🐮
Docker Client
The CLI for the Docker API
- Containers
- Images
- Volumes
- Networks
- etc
Containers
- cgroups for limiting resource usage
- namespaces for isolation
- union filesystem for a layered filesystem
Docker Environment
$ cd Downloads/mycluster

$ source docker.env
> . .\docker.ps1

$ env | grep DOCKER
> dir env:DOCKER*

DOCKER_HOST=tcp://146.20.68.14:2376
DOCKER_TLS_VERIFY=1
DOCKER_CERT_PATH=/Users/everett/Downloads/mycluster
DOCKER_VERSION=1.11.1

$ dvm use
Now using Docker 1.11.1
Containers
$ docker
Usage: docker [OPTIONS] COMMAND [arg...]
       docker [ --help | -v | --version ]

A self-sufficient runtime for containers...

$ docker ps
CONTAINER ID        IMAGE               COMMAND                  CREATED             STATUS              PORTS               NAMES
Containers
$ docker run --interactive --tty alpine:3.3 /bin/sh
/ # uname -a
Linux d020582f8e97 3.18.21-1-rackos #1 SMP Tue Oct 6 18:37:31 UTC 2015 x86_64 Linux

/ # ps
PID   USER     TIME   COMMAND
    1 root       0:00 /bin/sh
   17 root       0:00 ps

/ # exit
Containers
$ docker ps --latest
CONTAINER ID        IMAGE               COMMAND             CREATED             STATUS                     PORTS               NAMES
d020582f8e97        alpine:3.3          "/bin/sh"           5 minutes ago       Exited (0) 1 seconds ago                       96afcb76-6483-443e-941d-df9f803a4628-n2/pedantic_yalow

$ docker ps --latest --quiet
d020582f8e97

$ docker start $(docker ps -l -q)
d020582f8e97

$ docker ps -l
CONTAINER ID        IMAGE               COMMAND             CREATED             STATUS                     PORTS               NAMES
d020582f8e97        alpine:3.3          "/bin/sh"           6 minutes ago       Up 10 seconds                           96afcb76-6483-443e-941d-df9f803a4628-n2/pedantic_yalow

$ docker attach $(docker ps -l -q)
(Press enter if you just get a blank line)

/ # exit

$ docker rm $(docker ps -l -q)
d020582f8e97
Containers
$ docker run --detach --name ghost --publish 8080:2368 ghost:0.7
fbe7b7f520e8ba08925f4a2df1cd7d66bbacd25164656e25fca34e24127e7c73

$ docker logs ghost
...
Migrations: Complete
Ghost is running in development...
Listening on 0.0.0.0:2368
Url configured as: http://localhost:2368
Ctrl+C to shut down

$ docker ps -l
CONTAINER ID        IMAGE               COMMAND                  CREATED              STATUS              PORTS                          NAMES
fbe7b7f520e8        ghost:0.7           "/entrypoint.sh npm s"   About a minute ago   Up About a minute   172.99.77.191:8080->2368/tcp   96afcb76-6483-443e-941d-df9f803a4628-n2/ghost

$ open http://$(docker port ghost 2368/tcp)
> start http://$(docker port ghost 2368/tcp)

$ docker rm --force ghost
ghost
Lab #1
- Run an
nginx:1.9container in detached mode - Bind the container port 80 to the host port 80
- View the default nginx landing page
- Bonus Points: Replace the default nginx landing page using
docker cpand a file from your laptop - Stop the container and remove it
Container Resources
Images
- You can kinda sorta think of it like an image for a VM, but really it's a very different beast
- Layered filesystems
- Top layer is rw and the layers below are ro
- There's an analogy to Git but we won't be using
docker commit - By default, images are coming from Docker Hub
Images
$ docker images
REPOSITORY          TAG                 IMAGE ID            CREATED             SIZE
alpine              3.3                 90239124c352        31 hours ago        4.794 MB
cirros              latest              f8ce316a37a7        6 weeks ago         7.735 MB
nginx               1.9                 69203b7cd029        7 days ago          134.6 MB
swarm               1.1.0               4b5b33ba4e4f        2 weeks ago         18.11 MB
ghost               0.7                 c39498b8f953        2 weeks ago         352.2 MB
carina/consul       latest              2a49945a93ab        2 weeks ago         28.49 MB

$ docker pull alpine:3.3
96afcb76-6483-443e-941d-df9f803a4628-n1: Pulling alpine:3.3... : downloaded
Dockerfile
- Uses a basic DSL with instructions for building Docker images
- Provides a repeatable, transparent, and idempotent mechanism for creating images
- Each instruction adds a new layer to the image and then commits the image
Images
$ mkdir -p workshop/ex1
> mkdir -path workshop/ex1

$ cd workshop/ex1

$ touch Dockerfile

$ touch entrypoint.sh
Dockerfile
Edit Dockerfile
FROM alpine:3.3
MAINTAINER Firstname Lastname "firstname.lastname@example.com"

ARG BUILD_TIME_VAR="Default Build Time Message"
ENV RUN_TIME_VAR="Default Run Time Message"

RUN apk --no-cache add nginx

COPY entrypoint.sh /entrypoint.sh
RUN chmod u+x entrypoint.sh

WORKDIR /usr/share/nginx/html/

RUN echo $BUILD_TIME_VAR >> index.html

EXPOSE 80

ENTRYPOINT ["/entrypoint.sh"]
CMD ["Default CMD Message"]
Entrypoint Script
Edit entrypoint.sh
#!/bin/sh

set -euo pipefail

echo $RUN_TIME_VAR >> /usr/share/nginx/html/index.html
echo $1 >> /usr/share/nginx/html/index.html

exec nginx -g "daemon off;"
Images
$ docker build --build-arg BUILD_TIME_VAR="Chop Wood," --tag="nginx-message:1.0" .
Sending build context to Docker daemon 3.072 kB
Step 1 : FROM alpine:3.3
 ---> 90239124c352
...
Successfully built 3f7493082af2

$ docker images
REPOSITORY          TAG                 IMAGE ID            CREATED              SIZE
nginx-message       1.0                 3f7493082af2        About a minute ago   6.249 MB
...
Images
$ docker run --detach \
  --name nginx \
  --publish 80:80 \
  --env RUN_TIME_VAR="Carry Water," \
  nginx-message:1.0 \
  "Mow Lawn"
3f98a5832b79fe43f97aa07aaa9e425fa33cb7e195e61a6b0d39dfdd4dc0195e

$ open http://$(docker port nginx 80/tcp)
> start http://$(docker port nginx 80/tcp)

$ docker rm --force nginx
nginx

$ cd ..
PowerShell: Replace \ with `
Image Resources
Volumes
- A specially-designated directory within one or more containers that bypasses the container's Union File System
- Data is written directly to the node
- Designed to persist data, independent of the container’s life cycle
- Can be shared and reused among containers
Volumes
$ docker create --name data --volume /var/lib/mysql cirros
162bf49dbc24245a53095b5be611da3e820862dc8e837a66dab83d7e3f9d5b5a

$ docker ps -l
CONTAINER ID        IMAGE               COMMAND             CREATED             STATUS              PORTS               NAMES
162bf49dbc24        cirros              "/bin/true"         12 seconds ago                                              96afcb76-6483-443e-941d-df9f803a4628-n2/data

$ docker run --name mysql \
  --detach \
  --volumes-from data \
  --env MYSQL_ROOT_PASSWORD=my-root-pw --env MYSQL_DATABASE=test --env MYSQL_USER=test-user --env MYSQL_PASSWORD=test-password \
  mysql:5.6
6c38ad9739c47933e0a415912fbec83190bc519650dcb1412091d207f09a040d

$ docker run --rm \
  --volumes-from data \
  cirros \
  ls /var/lib/mysql
auto.cnf
ib_logfile0
ib_logfile1
ibdata1
mysql
performance_schema
test
PowerShell: Replace \ with `
Volumes
$ docker rm -f mysql
mysql

$ docker run --rm \
  --volumes-from data \
  cirros \
  ls /var/lib/mysql
auto.cnf
ib_logfile0
ib_logfile1
ibdata1
mysql
performance_schema
test

$ docker rm --volumes data
data
Volume Resources
- Use data volume containers (Carina)
- Manage data in containers
- Why didn't we use
docker volume?
Networks
- A secured and isolated environment for the containers in a network
- Automatic name resolution of containers using DNS
- The ability to dynamically connect containers to and disconnect containers from multiple networks
Networks
$ docker network create mynet
0b1194e03c4747be069eef05b6db67c13974d9717ebd859fcff7aa322aa48d9b

$ docker network ls
NETWORK ID          NAME                                                      DRIVER
0b1194e03c47        mynet                                                     overlay
33a440068243        96afcb76-6483-443e-941d-df9f803a4628-n1/none              null
3b126dcfc9ea        96afcb76-6483-443e-941d-df9f803a4628-n1/bridge            bridge
60cecf066b00        96afcb76-6483-443e-941d-df9f803a4628-n1/host              host
c3a94fdde28f        96afcb76-6483-443e-941d-df9f803a4628-n1/docker_gwbridge   bridge

$ docker run --name mysql \
  --detach \
  --net mynet \
  --env MYSQL_ROOT_PASSWORD=my-root-pw \
  mysql:5.6
60d49ac074902a721d6a90af5c4bd85363bed0a998fd4b19da61198f5340b73d

$ docker port mysql 3306
Error: No public port '3306/tcp' published for mysql
PowerShell: Replace \ with `
Networks
$ docker run --name wordpress \
  --detach \
  --net mynet \
  --publish 80:80 \
  --env WORDPRESS_DB_HOST=mysql \
  --env WORDPRESS_DB_PASSWORD=my-root-pw \
  wordpress:4.4
c7ebba7f81c1cf48bddbea6d3080713bea58b9de38ee7e7d422b0010b33daf12

$ open http://$(docker port wordpress 80/tcp)
> start http://$(docker port wordpress 80/tcp)

$ docker rm -f mysql wordpress
mysql
wordpress
Networks
$ docker ps --all
CONTAINER ID        IMAGE               COMMAND                  CREATED             STATUS              PORTS               NAMES
7573f6685549        swarm:1.2.0           "/swarm manage -H=tcp"   30 hours ago        Up 30 hours                             1dba0f72-75bc-4825-a5a0-b2993c535599-n1/swarm-manager
1d4f3859f9da        swarm:1.2.0           "/swarm join --addr=1"   30 hours ago        Up 30 hours                             1dba0f72-75bc-4825-a5a0-b2993c535599-n1/swarm-agent
d563be543c55        cirros                "/sbin/init"             30 hours ago        Created                                 1dba0f72-75bc-4825-a5a0-b2993c535599-n1/swarm-data
326c0fd484d8        swarm:carina-consul   "/entrypoint.sh agent"   30 hours ago        Up 30 hours                             1dba0f72-75bc-4825-a5a0-b2993c535599-n1/carina-svcd
dc0538bd0134        cirros                "/sbin/init"             30 hours ago        Created                                 1dba0f72-75bc-4825-a5a0-b2993c535599-n1/carina-svcd-data

# No need to run the following commands
$ docker rm container-name-1 container-name-2
$ docker rm $(docker ps -qf "status=exited")
Network Resources
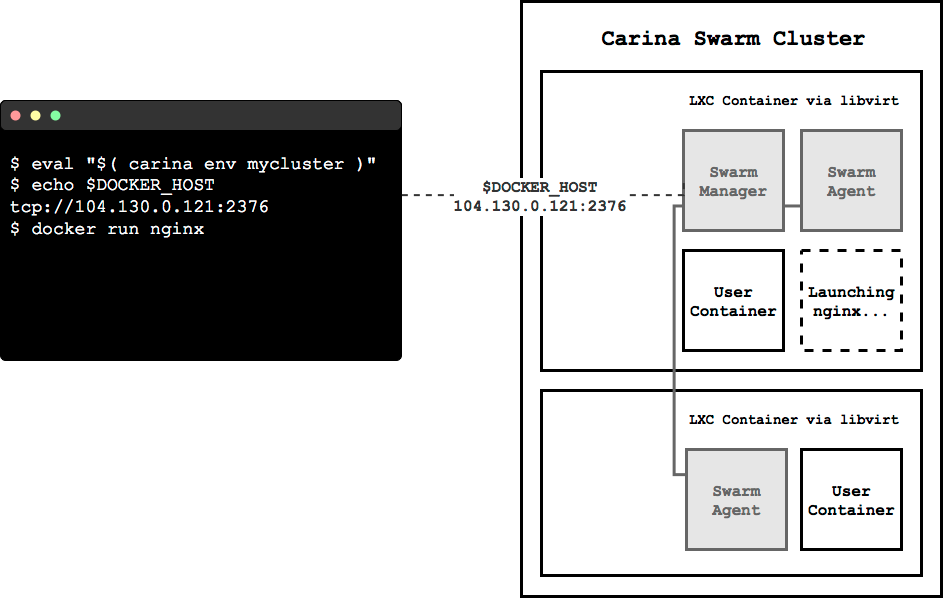
Docker Swarm and Carina
Carina
Push Button, Receive Swarm

Docker Swarm
- Many Docker Hosts, one API endpoint
- Introduces new concepts, like affinities
- Scheduling according to resource constraints
Carina CLI
See installation and configuration instructions
List your Clusters
$ carina ls
ClusterName       Flavor           nodes           AutoScale          Status
mycluster         container1-4G    1                  false              active
$ carina ls
ClusterName Flavor nodes AutoScale Status
mycluster container1-4G 1 false active
* DO NOT run the commands below *
Create a Cluster
$ carina create --wait foobar
ClusterName     Flavor          nodes         AutoScale        Status
foobar          container1-4G   1                false            active
Rebuild a Cluster
$ carina rebuild foobar
ClusterName     Flavor          nodes         AutoScale        Status
foobar          container1-4G   1                false            rebuilding-swarm
Carina CLI Continued
Load the Docker environment for your Cluster
$ carina env mycluster
source /Users/caro8994/.carina/clusters/carolynvsrax/mycluster/docker.env
# Run the command below to get your Docker environment variables set:
# eval $(carina env mycluster)

PS> carina env mycluster --shell powershell
. C:\Users\caro8994\carina\clusters\carolynvsrax\mycluster\docker.ps1
# Run the command below to get your Docker environment variables set:
# carina env mycluster --shell powershell | iex

$ eval $(carina env mycluster)
PS> carina env mycluster --shell powershell | iex

$ docker ps
CONTAINER ID      IMAGE      COMMAND                  CREATED             STATUS
ab668e03cafb      logjam     "tail -f /var/log/foo"   3 seconds ago       Up 3 seconds
Carina CLI Continued
Grow Your Cluster
$ carina ls
ClusterName        Flavor             nodes           AutoScale          Status
mycluster          container1-4G      1               false              active

# Don't run these commands right now
$ carina grow --by 1 mycluster
ClusterName        Flavor             nodes           AutoScale          Status
mycluster          container1-4G      1               false              growing

$ carina ls
ClusterName        Flavor             nodes           AutoScale          Status
mycluster          container1-4G      2               false              active
Swarm Scheduling in Action
$ docker run --name whoa1 --detach --publish 80:8080 rackerlabs/whoa
44aff6801d136ae7ba49ad074d94a7ba94740326f8d9099d7830ec8095abdf72

$ docker port whoa1 8080
104.130.0.119:80

$ docker run --name whoa2 --detach --publish 80:8080 rackerlabs/whoa
docker: Error response from daemon: Unable to find a node that satisfies the following conditions
[port 80 (Bridge mode)].

$ curl $(docker port whoa1 8080/tcp)
🎉  Whoa!  🎉

$ docker rm -f whoa1
whoa1
Lab #2
- Grow the cluster by 1 node
- Run 2 instances of
rackerlabs/whoaon port 80 - Stop the containers and remove them
Where does it run?
Factors that implicitly influence container placement
--publishfinds a node with the published port free--volumes-fromuses the same node as the named container
Constraints and Affinity
Explicitly influence where your containers run
Set by environment variables or build arguments
# Run on the same node as another container
$ docker run --env affinity:container==backend ...

# Run on a node where image is available
$ docker run --env affinity:image==myapp ...

# Explicit node name
$ docker run --env constraint:node==*n1 ...

# Build a new image on the same node as an existing container
$ docker build --build-arg affinity:image==myapp -t myapp:v2 .
Carina Clusters
- 1 to 3 "nodes"; LXC containers on a physical host
- 20 GB disk space, 4 GB memory, 2 vCPUs per node
- Each node has its own public IP, discoverable via
docker info
$ docker info
Containers: 9
 Running: 5
 Paused: 0
 Stopped: 4
Images: 13
Server Version: swarm/1.2.0
Role: primary
Strategy: spread
Filters: health, port, dependency, affinity, constraint
Nodes: 2
...
Carina Restrictions
tldr: You don't have access to the underlying Docker host
--volume HOST:CONTAINER--privileged--cap-add/dropCarina Resources
Break
Notebook
Outline
- Interactive Literate Coding
- Collaboration
- Visualization
- Rich objects
- Share-able documents
Living Code
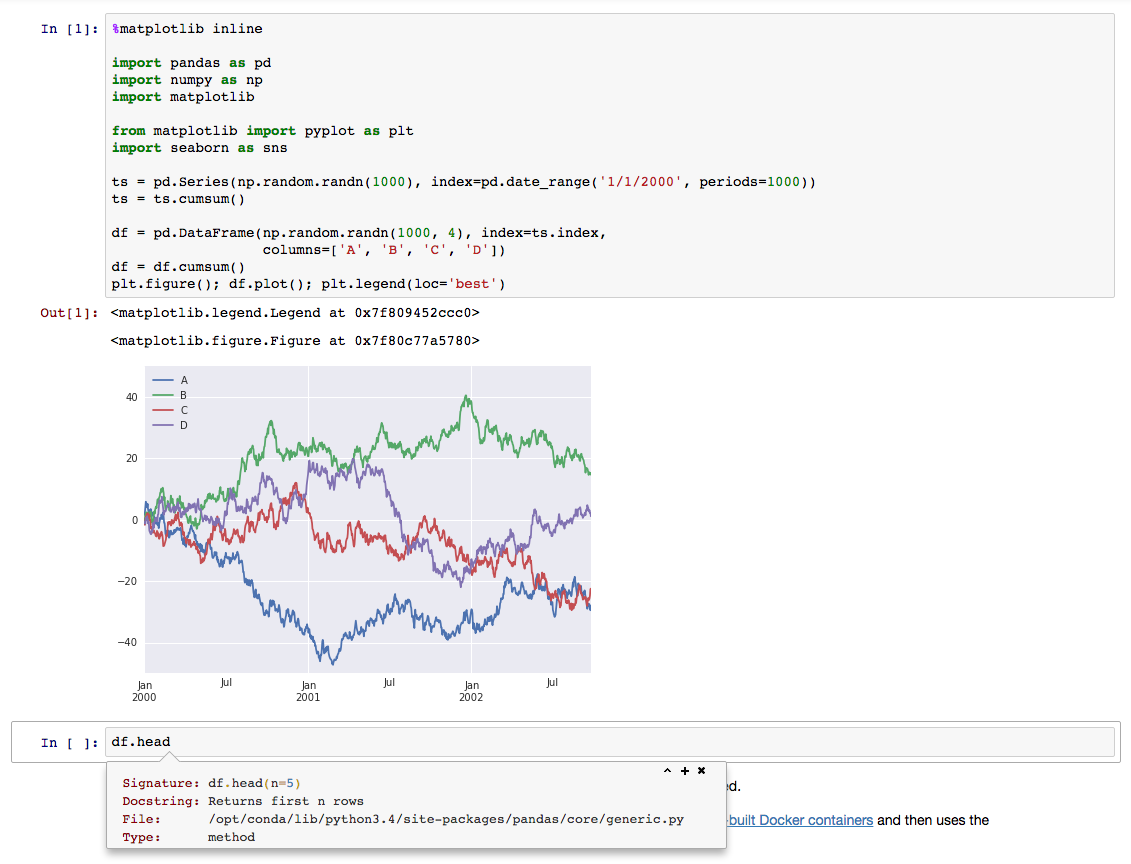
Let's try it live!
tmpnb.org
JupyterHub on Carina
JupyterHub Architecture
- Notebook servers for users
- Configurable HTTP Proxy
- Bring your own auth
Outline
- Clone the repo for this preso
- Rely on jupyterhub-launch
Clone this repo
git clone https://github.com/getcarina/jupyterhub-tutorial.git
If you don't have git, download the repository.
Configure GitHub OAuth
Get your node IP address
$ docker run --rm --net=host --env constraint:node==*n1 racknet/ip public ipv4
146.20.68.51
Configure GitHub OAuth Cont.
Create a new developer application on GitHub
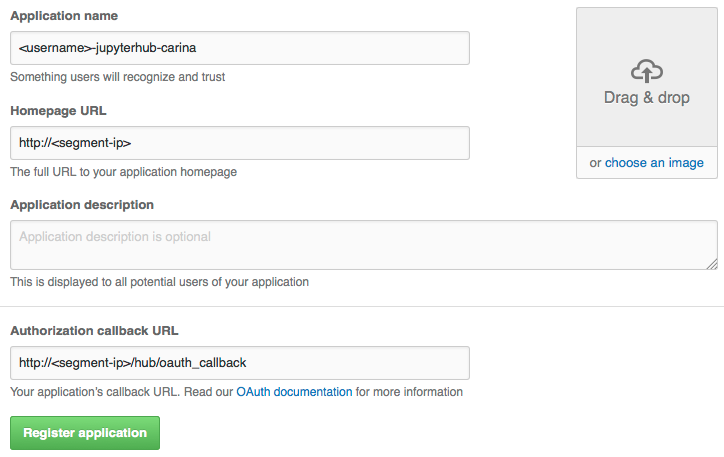
Configure GitHub OAuth Cont.
Copy your secrets
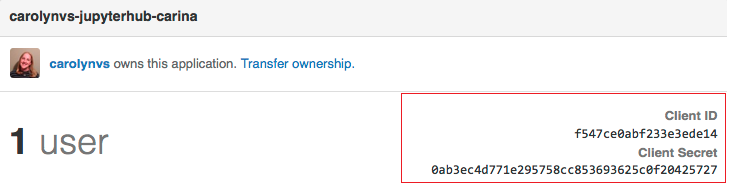
Yes, I reset my secret after this screenshot...
Launch
$ cd jupyterhub-tutorial/jupyterhub-launch

$ export DNSNAME=$(docker run --rm --net=host --env constraint:node==*n1 racknet/ip public ipv4)
$ export JUPYTERHUB_USERS=[github-user]
$ export GITHUB_CLIENT_ID=[github-client-id]
$ export GITHUB_CLIENT_SECRET=[github-client-secret]
$ ./launch.sh

PS> carina env jupyterhub --shell powershell | iex
PS> $env:DNSNAME=$(docker run --rm --net=host racknet/ip public ipv4); `
  $env:JUPYTERHUB_USERS="[github-user]"; `
  $env:GITHUB_CLIENT_ID="[github-client-id]"; `
  $env:GITHUB_CLIENT_SECRET="[github-client-secret]"; `
  .\launch.ps1
Your web browser should automatically open to display JupyterHub.
Start your Jupyter Notebook
- Sign in with GitHub
- Start your Jupyter server
- Copy a notebook to your server
- Open the Welcome to Python notebook
docker cp welcome-to-python.ipynb jupyter-[github-user]:/home/jovyan/workReview
Wrap up
Clean up
$ carina rm mycluster
ClusterName         Flavor              Nodes       AutoScale       Status
mycluster           container1-4G       2           false           deleting
How to Whale
Thanks!
| Everett Toews | @everett_toews |
| Ash Wilson | @smashwilson |